ご無沙汰しております。松山事務所の石丸です。
業務が多忙なのを言い訳に、前回から3ヶ月も空いてしまいました。
前回までiOS入門という内容で記事を書いてきましたが、今回からはもっと実用的(?)なコードや、アプリの作りについて書いていきたいと思います。
今回の内容はタイトル通り、UIViewControllerからUITableViewDataSourceの分離についてです。
開発環境はOS X EI Capitan(ver10.11.6)、Xcode(ver7.3.1)で、Swiftのバージョンは2.2になります。
よくある実装
UITableViewを使ったサンプルプログラムのほとんどが、UIViewControllerでUITableViewDataSourceプロトコルを実装しています。
わかりやすさのため最小限のコードでUITableViewの使い方を表現するには適切なサンプルです。
import UIKit

class ViewController: UIViewController, UITableViewDataSource {
 @IBOutlet weak var tableView1: UITableView!
 @IBOutlet weak var tableView2: UITableView!

 enum TableViewTag: Int {
 case TableView1 = 1
 case TableView2 = 2
 }

 let tableViewDataSource1 = ["table1-1", "table1-2", "table1-3"]
 let tableViewDataSource2 = ["table2-1", "table2-2", "table2-3"]

 func tableView(tableView: UITableView, cellForRowAtIndexPath indexPath: NSIndexPath) -> UITableViewCell {
 guard let tag = TableViewTag(rawValue: tableView.tag) else { return UITableViewCell() }

 switch tag {
 case .TableView1:
 let cell = tableView1.dequeueReusableCellWithIdentifier("Cell", forIndexPath: indexPath) as UITableViewCell
 cell.textLabel?.text = tableViewDataSource1[indexPath.row]
 return cell
 case .TableView2:
 let cell = tableView2.dequeueReusableCellWithIdentifier("Cell", forIndexPath: indexPath) as UITableViewCell
 cell.textLabel?.text = tableViewDataSource2[indexPath.row]
 return cell
 }
 }

 func tableView(tableView: UITableView, numberOfRowsInSection section: Int) -> Int {
 guard let tag = TableViewTag(rawValue: tableView.tag) else { return 0 }

 switch tag {
 case .TableView1:
 return tableViewDataSource1.count
 case .TableView2:
 return tableViewDataSource2.count
 }
 }

 override func viewDidLoad() {
 super.viewDidLoad()
 // Do any additional setup after loading the view, typically from a nib.
 tableView1.dataSource = self
 tableView1.registerClass(UITableViewCell.self, forCellReuseIdentifier: "Cell")
 tableView2.dataSource = self
 tableView2.registerClass(UITableViewCell.self, forCellReuseIdentifier: "Cell")
 }

 override func didReceiveMemoryWarning() {
 super.didReceiveMemoryWarning()
 // Dispose of any resources that can be recreated.
 }
}
ここでは面倒なことに画面内に2つのUITableViewがある場合のコードを書いてみました。
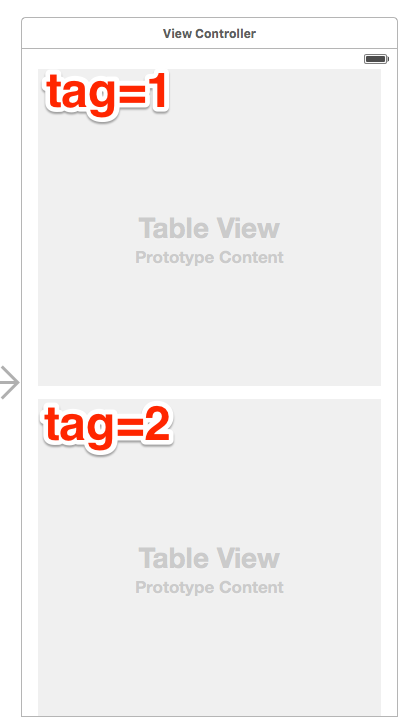
UIViewControllerはUITableViewDataSourceプロトコルを実装し、それぞれのUITableViewにStoryboard上で設定したtagによって処理を振り分けています。
本来なら各UITableViewに設定するtagはコード上で定数を定義したいところですが、InterfaceBuilderから参照できないので、tagを表すenumを定義しています。
実行結果は次のようになります。

なぜUITableViewDataSourceを分離するのか
業務や趣味でちゃんとアプリを作り始めると、TableViewに関するコードでUIViewControllerがどんどん太ってしまい見通しが悪くなります。
また、各UITableViewがdataSourceとしてUIViewControllerに依存しているため、他の画面で再利用もできません。
tagで分岐するためのswich文もUIViewController内に散らばってしまいます。
画面と分離しやすいUITableViewDataSourceをUIViewControllerから分離することで、UIViewControllerをスマートに保つことができます。
シンプルなデータ構造のUITableViewDataSource
UITableViewDataSourceプロトコルの実装必須なメソッドは、
セルを作って返すメソッド
func tableView(tableView: UITableView, cellForRowAtIndexPath indexPath: NSIndexPath) -> UITableViewCell
と
テーブルの行数を返すメソッド
func tableView(tableView: UITableView, numberOfRowsInSection section: Int) -> Int
の2つです。
サンプルもそうであるように、シンプルなデータ構造であれば、データを配列で保持し、indexPath.rowで対応するデータからセルを作り、テーブルの行数は配列のcountが対応します。
import UIKit

class TableViewDataSource<T>: NSObject, UITableViewDataSource {
 typealias SetupCellCallbackT = (cell: UITableViewCell, data: T) -> Void

 var dataSource = [T]()
 private let cellId: String
 private let setupCellCallback: SetupCellCallbackT

 init(cellId: String, setupCellCallback: SetupCellCallbackT) {
 self.cellId = cellId
 self.setupCellCallback = setupCellCallback
 }

 func tableView(tableView: UITableView, cellForRowAtIndexPath indexPath: NSIndexPath) -> UITableViewCell {
 let cell = tableView.dequeueReusableCellWithIdentifier(cellId, forIndexPath: indexPath) as UITableViewCell
 setupCellCallback(cell: cell, data: dataSource[indexPath.row])
 return cell
 }

 func tableView(tableView: UITableView, numberOfRowsInSection section: Int) -> Int {
 return dataSource.count
 }
}
保持するデータ型はGenericsで指定し、イニシャライザでセルのIDとセルにデータを設定するコールバック関数を受け取ります。
データに応じてセルのIDが変わるような場合は、セルの生成をまるごとコールバック関数にまかせてしまう作りもありますが、ここでのキモはNSObjectを継承しているところです。
NSObjectを継承しなかった場合は、
Type ‘TableViewDataSource<T>’ does not conform to protocol ‘UITableViewDataSource’
というエラーが出ます。
参考サイト:How to make a class conform to a protocol in Swift?
ViewControllerの実装
TableViewDataSourceを使ったUIViewControllerの実装は次のようになります。
import UIKit

class ViewController: UIViewController {
 @IBOutlet weak var tableView1: UITableView!
 @IBOutlet weak var tableView2: UITableView!

 let tableViewDataSource1 = TableViewDataSource<String>(cellId: "Cell", setupCellCallback: { (cell, data) in
 cell.textLabel?.text = data
 })

 let tableViewDataSource2 = TableViewDataSource<String>(cellId: "Cell", setupCellCallback: { (cell, data) in
 cell.textLabel?.text = data
 })

 override func viewDidLoad() {
 super.viewDidLoad()
 // Do any additional setup after loading the view, typically from a nib.
 tableViewDataSource1.dataSource = ["table1-1", "table1-2", "table1-3"]
 tableView1.dataSource = tableViewDataSource1
 tableView1.registerClass(UITableViewCell.self, forCellReuseIdentifier: "Cell")

 tableViewDataSource2.dataSource = ["table2-1", "table2-2", "table2-3"]
 tableView2.dataSource = tableViewDataSource2
 tableView2.registerClass(UITableViewCell.self, forCellReuseIdentifier: "Cell")
 }

 override func didReceiveMemoryWarning() {
 super.didReceiveMemoryWarning()
 // Dispose of any resources that can be recreated.
 }
}
いかがでしょう?
各UITableViewのdataSourceとしてUIViewControllerではなく、TableViewDataSourceを指定し、データの管理はTableViewDataSourceに任せてしまいます。tagで分岐するためのswich文もなくなり、だいぶスリムになったのではないでしょうか。
今回はここまで。ありがとうございました。